Implementing GitOps on Kubernetes Using AWS, K3s, Rancher, Vault, and ArgoCD

As Kubernetes continues to establish itself as the industry-standard for container orchestration, finding effective ways to use a declarative model for your applications and tools is critical to success. In this write-up, I’m going to walk through setting up a K3s Kubernetes cluster in AWS, then implement secure GitOps using ArgoCD and Vault. Check out the source for the infrastructure and the Kubernetes umbrella application here.
Here’s the components/tools we’ll be using:
- AWS — The cloud provider we’ll be using for our underlying infrastructure. This will manage our virtual machines and networking required to make Kubernetes work, and allow ingress into the cluster from the outside world.
- K3s — A rancher-developed Kubernetes distribution that is streamlined. It has a lot of the alpha and cloud plugins cleaned up, while also allowing the use of a relational database (in this case, RDS) instead of etcd for backend storage.
- Rancher — An API-driven UI for easily administering your Kubernetes cluster.
- Vault — Hashicorp’s implementation for secret management. I’ll be using Banzai Cloud’s bank-vaults implementation of vault, which allows for secrets to be injected directly into pods using an Admission Webhook. This greatly alleviates your need to store secrets in Git repositories.
- ArgoCD — A GitOps tool to allow you to maintain state of your Kubernetes resources within Git. ArgoCD will automatically sync your Kubernetes resources with what is in your Git repository, while also ensuring manual changes made to manifests within the cluster will be automatically reverted. This ensures your declarative deployment model.
- Cert Manager/LetsEncrypt — Gives a way to automatically generate and renew certificates for Kubernetes ingress.
Let’s get started with the AWS infrastructure.
Prerequisites
You’ll need the following CLIs installed on your system:
- Terraform
- Kubectl
- AWS
You’ll also need AWS admin access and an access key/secret. If you don’t have one, you can create an account using a credit card.
Lastly, you’ll need a hosted domain name that you can manage/update to point to your Kubernetes-based ELB. If you don’t already have one, I’d recommend making an account on NameCheap and buying a .dev domain. They’re cheap and work great.
AWS Infrastructure
For our AWS infrastructure, we’re going to use Terraform backed with S3 to persist state. This gives us a way to declaratively define our infrastructure and iteratively make changes when we need to. Looking at the infrastructure repository, you’ll see a k3s/example.tfvars file. We’ll need to update this for our specific environment/use-case, setting the following values:
- db_username — The admin username to be applied for the RDS instance that will be used for Kubernetes backend storage.
- db_password — The admin password for the RDS user. This should generally be passed in during your terraform apply command in-line, but for simplicity’s sake, we’ll set it in-file.
- public_ssh_key — Your public SSH key that you will use if you ever need to SSH to the Kubernetes EC2s.
- keypair_name — The keypair name to be applied fo r your public_ssh_key.
- key_s3_bucket_name — The bucket to be generated that will store your kubeconfig file when the cluster is successfully created. This needs to be globally unique to Amazon.
You can set some of the optional fields below if you want to modify cluster sizes or set specific CIDRs, but by default you will get a 6-node (3 server, 3 agent) K3s cluster.
You’ll also need to create an S3 bucket to store your Terraform state and change the bucket field in both the k3s/backends/s3.tfvars and k3s/main.tf files to match it.
Once we have all of our fields updated and S3 state bucket created, let’s go ahead and apply Terraform. First, make sure you have an administrative IAM user in an AWS account and that you’ve set the appropriate environment variables or AWS credential files on your system to be able to interface with the AWS API, then run the following:
cd k3s/
terraform init -backend-config=backends/s3.tfvars
terraform apply -var-file=example.tfvars
Once you execute the above, Terraform will output the expected AWS state after a successful apply. You can look through it and then type yes if everything looks as expected. It should take 5–10 minutes for the AWS resources to be provisioned, mostly due to the RDS cluster.
Verifying your Kubernetes Cluster
Once Terraform has successfully applied (plus a few minutes to ensure K3s has deployed), you’ll need to grab the kubeconfig file from the S3 bucket using the following command (substituting the bucket name you entered in example.tfvars):
aws s3 cp s3://YOUR_BUCKET_NAME/k3s.yaml ~/.kube/configThat should complete successfully, giving you the ability to now communicate with your cluster. Let’s check on the status of our nodes. Before moving on, make sure they are all in the Ready state:
$ kubectl get nodes
NAME                         STATUS   ROLES    AGE   VERSION
ip-10-0-1-208.ec2.internal   Ready    <none>   39m   v1.18.9+k3s1
ip-10-0-1-12.ec2.internal    Ready    master   39m   v1.18.9+k3s1
ip-10-0-1-191.ec2.internal   Ready    master   39m   v1.18.9+k3s1
ip-10-0-2-12.ec2.internal    Ready    master   39m   v1.18.9+k3s1
ip-10-0-2-204.ec2.internal   Ready    <none>   39m   v1.18.9+k3s1
ip-10-0-1-169.ec2.internal   Ready    <none>   39m   v1.18.9+k3s1
Let’s also check on the status of ArgoCD, which was automatically deployed via manifests:
$ kubectl get pods -n kube-system | grep argocd
helm-install-argocd-5jc9s                        0/1     Completed   1          40m
argocd-redis-774b4b475c-8v9s8                    1/1     Running     0          40m
argocd-dex-server-6ff57ff5fd-62v9b               1/1     Running     0          40m
argocd-server-5bf58444b4-mpvht                   1/1     Running     0          40m
argocd-repo-server-6d456ddf8f-h9gvd              1/1     Running     0          40m
argocd-application-controller-67c7856685-qm9hm   1/1     Running     0          40m
Now we can move onto configuring wildcard DNS for our ingress and certificate automation.
DNS Configuration
For DNS, I own the atoy.dev domain through NameCheap, but you can use whatever DNS provider you’d like. What we need to do is create a wildcard CNAME entry to route all requests to our AWS ELB that is managing application ingress.
First, get your Elastic Load Balancer hostname by going to your AWS console, navigating to the EC2 section, and clicking on Load Balancers on the left-hand side menu. Once you’re there, you should see a new LoadBalancer created with random characters. If you check the tags, it should reference your new Kubernetes cluster:
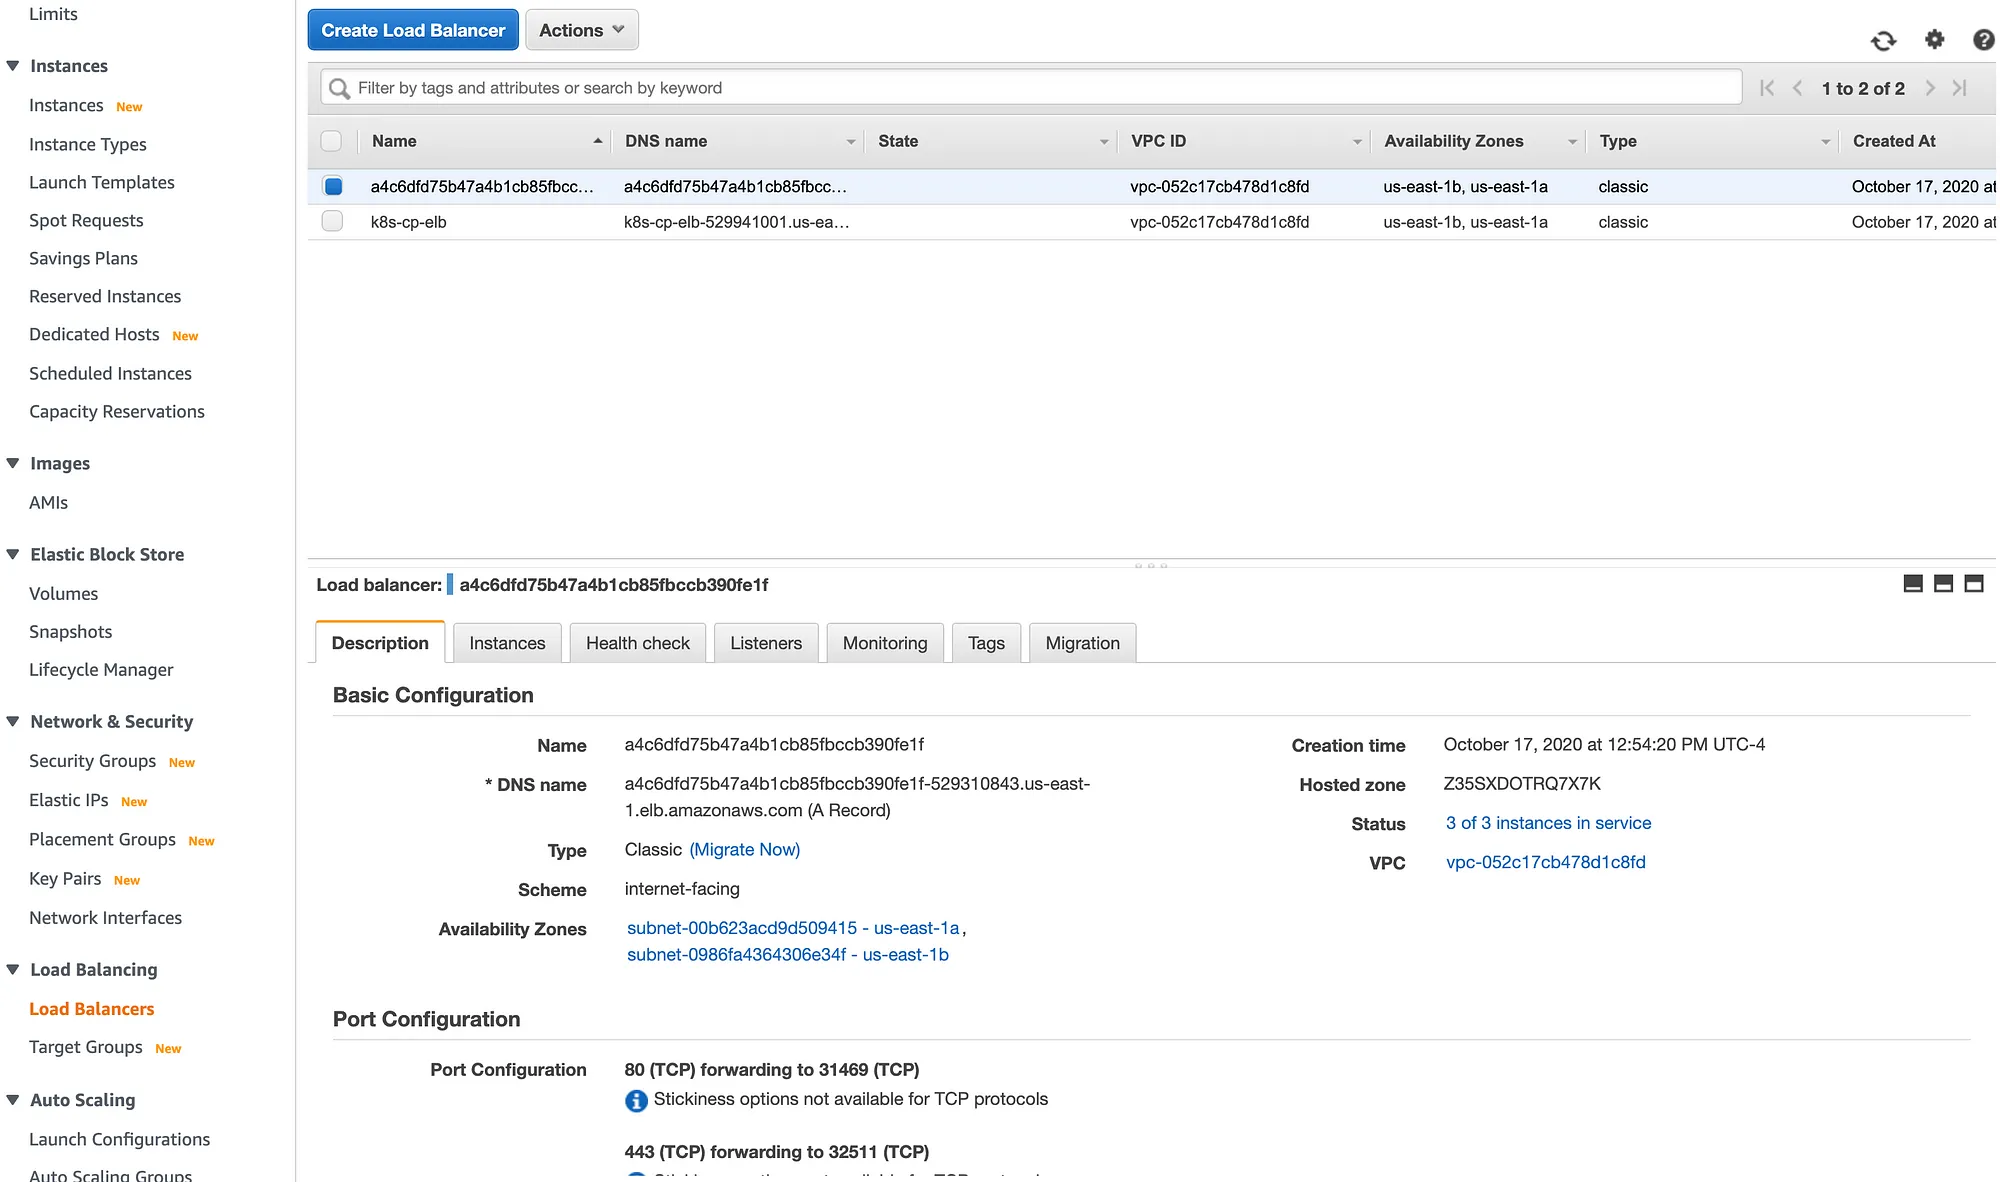
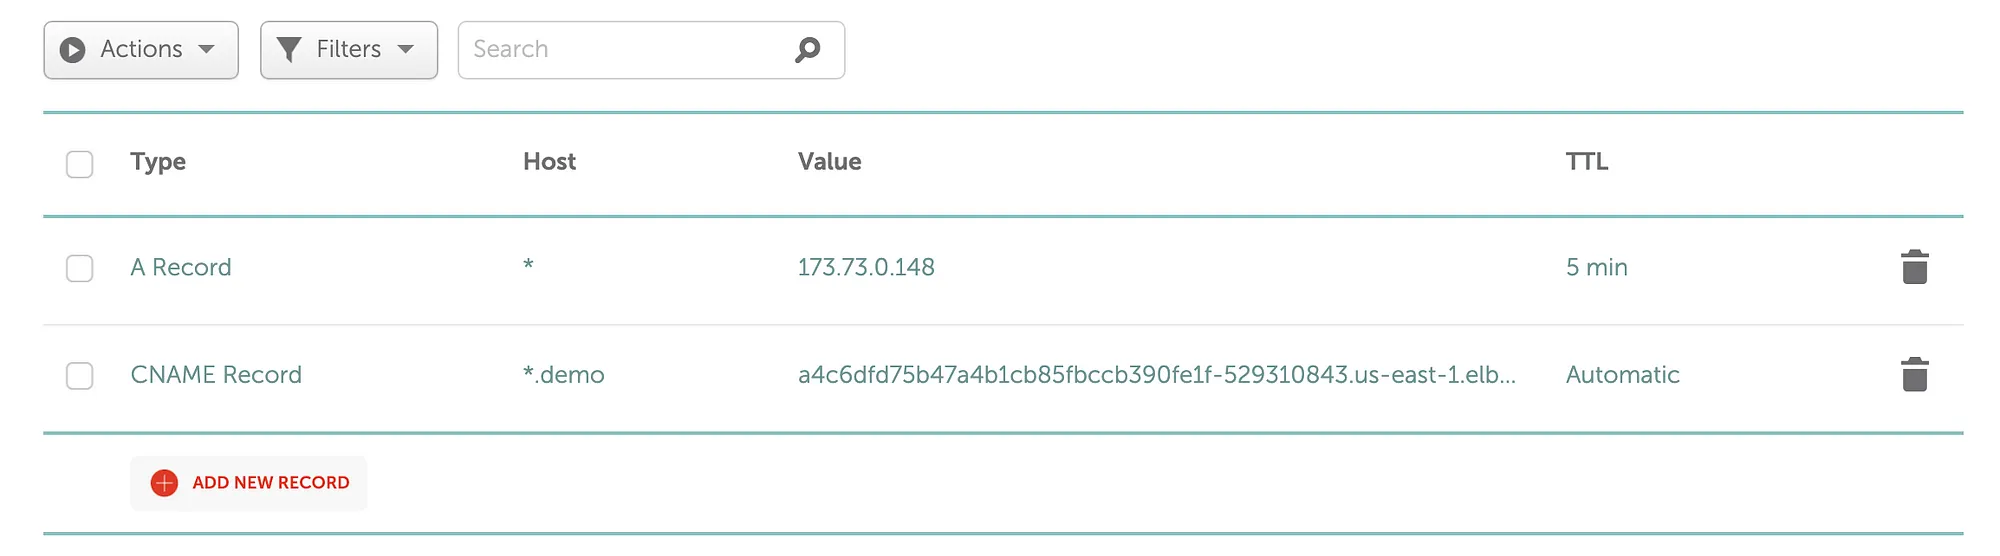
You’ll want to copy the DNS name from that entry. For me, I then navigated to my NameCheap advanced DNS page for my domain and entered a CNAME entry for *.demo.atoy.dev pointing to the DNS name you copied from AWS. You can adjust this for your provider/domain:
To verify it works, you can install/use nslookup to ensure it resolves to the right hostname:
$ nslookup test.demo.atoy.dev
Server:  71.252.0.12
Address: 71.252.0.12#53Non-authoritative answer:
test.demo.atoy.dev canonical name = a4c6dfd75b47a4b1cb85fbccb390fe1f-529310843.us-east-1.elb.amazonaws.com.
Name: a4c6dfd75b47a4b1cb85fbccb390fe1f-529310843.us-east-1.elb.amazonaws.com
Address: 52.20.5.150
Name: a4c6dfd75b47a4b1cb85fbccb390fe1f-529310843.us-east-1.elb.amazonaws.com
Address: 23.20.0.2
Now onto the Umbrella application.
ArgoCD and the Umbrella Application
We already know ArgoCD is deployed, but now we want to deploy the rest of our suite of tools using ArgoCD’s App-of-Apps deployment model. Since we’re working with GitOps, you’ll need to fork the k8s-tools-app repository to your own Github account, and then we’ll need to make a few changes to match your respective environment:
- You’ll need to do a global find/replace for
https://github.com/atoy3731/k8s-tools-app.gitand change it to your new repository git URL that you’ve forked to. This lets you manage your own environment that ArgoCD can pull from. Make sure your Git repository is public so ArgoCD can access it. - In
resources/tools/resources/other-resources.yaml, change theargoHostandissuerEmailto match your domain name and email. - In
resources/tools/resources/rancher.yaml, change thehostnameand theemailto match your respective domain name and email. - In
resources/apps/resources/hello-world.yaml, change the 2 references toapp.demo.atoy.devto match your domain.
Once you’ve made those updates, go ahead and commit/push your changes to your forked Github repository. Now you’re ready to apply the umbrella application. Do the following in your locally cloned repository:
$ kubectl apply -f umbrella-tools.yaml
appproject.argoproj.io/tools created
application.argoproj.io/umbrella-tools created
Now, the magic of ArgoCD will start provisioning all of other tools the repository had defined for your cluster. You can get a list of the deployed applications by doing the following:
$ kubectl get applications -n kube-system
NAME                AGE
other-resources     56m
umbrella-tools      58m
rancher             57m
vault-impl          57m
vault-operator      58m
vault-webhook       57m
cert-manager        57m
cert-manager-crds   58m
You’ll have to wait 5 minutes or so for everything to provision and for LetsEncrypt to generate the staging certificates. Once things are running as expected, you should see 2 ingress entries generated that you can access via your browser:
$ kubectl get ingress -A
NAMESPACE       NAME             CLASS    HOSTS                     ADDRESS                                                                  PORTS     AGE
cattle-system   rancher          <none>   rancher.demo.atoy.dev   a4c6dfd75b47a4b1cb85fbccb390fe1f-529310843.us-east-1.elb.amazonaws.com   80, 443   59m
kube-system     argocd-ingress   <none>   argo.demo.atoy.dev      a4c6dfd75b47a4b1cb85fbccb390fe1f-529310843.us-east-1.elb.amazonaws.com   80, 443   58m
Now you can navigate to Rancher via https://rancher.YOUR-DOMAIN and to ArgoCD via https://argo.YOUR-DOMAIN
NOTE 1: To avoid any rate-limiting from LetsEncrypt, we’re using staging certificates that are not valid. There is a good chance when you go to Argo, Rancher, or your hello-world application in your browser, it’ll give you an SSL exception. Using Chrome, type thisisunsafe when your exception page loads and it will let you bypass it. You can also look into updating the ClusterIssuer for cert-manager to use production-grade, trusted certificates.
NOTE 2: K3s comes pre-installed with Traefik for an ingress controller, so we’re using that to keep things simple.
NOTE 3: Upon first logging into Rancher, you’ll need to generate a password and accept the URI used to access Rancher. The URI should be pre-loaded in the form, so you can just click Okay.
NOTE 4: To log into ArgoCD, it uses admin as the username, and the argocd-server pod name as the password. You can get this server pod name by doing the following (it’d be argocd-server-5bf58444b4-mpvht in this case):
$ kubectl get pods -n kube-system | grep argocd-server
argocd-server-5bf58444b4-mpvht                   1/1     Running     0          64m
Now you should be able to navigate to the ArgoCD UI, login, and see something similar to the following:

Now that our tools are deployed, let’s store a secret in our Vault for our hello-world app to ingest.
Creating a Secret in Vault
To make things easier, there is a helper script within your tools repository. Run the following command to get your Vault admin token and port-forward command:
$ sh tools/vault-config.sh
Your Vault root token is: s.qEl4Ftr4DR61dmbH3umRaXP0Run the following:
export VAULT_TOKEN=s.qEl4Ftr4DR61dmbH3umRaXP0
export VAULT_CACERT=/Users/adam.toy/.vault-ca.crt
kubectl port-forward -n vault service/vault 8200 &You will then be able to access Vault in your browser at: https://localhost:8200
Run the command that is output, then navigate to https://localhost:8200. To log in, enter the root token from above.
When you log in, you should be at a Secret Engine page. Click on the secrets/ entry and then click Create Secret in the upper-right hand. We’re going to create a demo secret, so add the following and click Save:

Now you have a secret ready for your hello-world application to ingest!
Deploying the Hello World Application
Now, back at the parent of our repo, let’s run the following to deploy the hello-world application:
$ kubectl apply -f umbrella-apps.yaml
appproject.argoproj.io/apps created
application.argoproj.io/umbrella-apps created
Once that is created, navigate back to your ArgoCD UI and you should now see 2 new applications, umbrella-apps and demo-app. Click on demo-app and wait for all the resources to be healthy:

Once that is healthy, you should be able to navigate to your application by going to https://app.YOUR-DOMAIN:

Let’s also verify that our Vault secret is being injected into our application pods. Within the demo-app of your ArgoCD UI, click on one of the pods for your application, then click the Log tab at the top. There should be 2 containers in the left, so select the test-deployment container. At the top of the logs, you should see your secret being output between the 2 lines of equal signs:

Testing Out GitOps
Now let’s test ArgoCD to make sure it will automatically sync when we make some changes in our repository.
In your tools repository, find the resources/apps/resources/hello-world.yaml file and change the replicaCount value from 5 to 10 . Commit and push your change to the master branch, then navigate back to the demo-app in your ArgoCD UI. When ArgoCD hits its refresh interval, it’ll automatically start deploying 5 more replicas of our application (you can use the Refresh button in your umbrella-apps Argo application if you don’t want to wait):

Tearing Down
If you’re ready to tear down your cluster, you need to first go to your AWS console, the EC2 service, and click on Load Balancers. There will be an ELB that the Kubernetes cloud provider created but isn’t managed by Terraform that you need to clean up. You also need to delete the Security Group that that ELB is using.
After you’ve cleaned the ELB up, run the following and type “yes” when prompted:
terraform destroy -var-file=example.tfvarsWhat’s Next?
Great! We have a great toolset at our disposal to deploy applications using GitOps. What is the next step? If you’re up for a challenge, I’d work to deploy your own application beside the hello-world application, and even try implementing CI/CD by updating image tags within your application manifest repository. That way, when a new application image is built, the new tag will automatically be updated in the manifest repository, and ArgoCD will deploy the new version.
Hopefully you enjoyed the read and learned something new! Thanks for reading.